Discovering rodents in your home is stressful. Mice and rats aren’t just annoying—they damage property, contaminate food, and pose health risks. The good news? You have options. Some rodent problems can be handled with DIY methods, while others need professional help.
This guide covers practical DIY rodent control strategies you can try right now, plus when to call in the experts. Whether you’re dealing with your first mouse or a recurring infestation, we’ll walk you through solutions that actually work.
UNDERSTANDING YOUR RODENT PROBLEM
Before you start fighting rodents, understand what you’re dealing with.
Rats vs. Mice
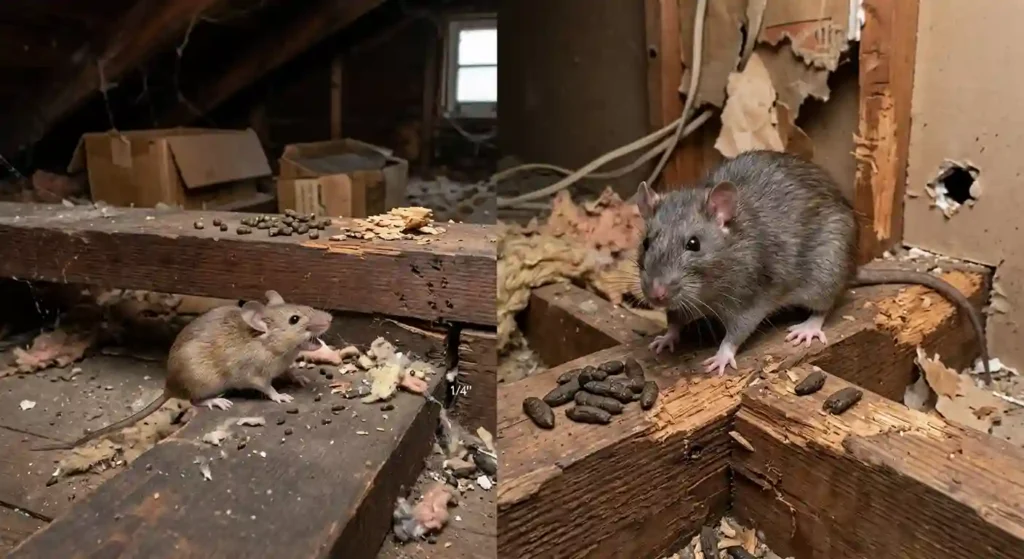
Mice are smaller (about 3 inches long) and squeak a lot. You’ll find them in walls, attics, and kitchens. Rats are bigger (6-8 inches) and more aggressive. They cause more damage and multiply faster.
Both can squeeze through tiny openings. Both contaminate food and leave droppings. Both need to be removed quickly.
"Avoid These Common DIY Rodent Control Mistakes Many homeowners accidentally make the problem worse by: Placing traps in the wrong locations Ignoring small entry points around the home Leaving food or pet food accessible Relying only on poison without addressing how rodents are getting inside Stopping treatment too soon after activity decreases"
Why Rodents Enter Your Home?
Rodents want three things: shelter, food, and water. When outdoor temperatures drop, they seek warmth. Your home offers all three. They don’t care about cleanliness—they’ll invade any home with entry points.
Understanding this matters because it shapes your solution. You’re not just trapping rodents. You’re removing what attracts them and sealing how they enter.
STEP 1: IDENTIFY THE PROBLEM
You can’t solve a problem you don’t see clearly.
Early Signs of Rodents
Look for these warning signs in your home:
Fresh droppings appear along walls, in cabinets, and under sinks. Mice droppings are small (rice-grain sized). Rat droppings are larger. Fresh droppings mean active rodent presence right now.
Listen for sounds at night. Scratching in walls and attics means rodents are moving through your home. Squeaking usually means multiple rodents.
Check for gnaw marks on wires, wood, and plastic. Rodents chew constantly to sharpen their teeth. Fresh gnaw marks on electrical wires are dangerous—they can cause fires.
Look for nests made from shredded paper, fabric, and insulation. Finding a nest means rodents have settled in and may be breeding.
Smell musty odors in enclosed spaces? This often signals rodent urine and feces. Trust your nose—it’s accurate.
See grease marks along baseboards and walls? Rodents follow the same paths repeatedly, leaving dark smudges.
How Bad Is the Infestation?
A few droppings in one corner? Probably early stage. You might handle it yourself.
Droppings in multiple rooms? Nests in the attic? Sounds every night? This is serious. Professional help is smarter.
STEP 2: SEAL ENTRY POINTS
This is the most important DIY step. Trapping rodents without sealing entry points is pointless ,new ones just move in.
Find Where They Enter
Walk around your home’s exterior. Look for:
Cracks in the foundation. Even small cracks (quarter-inch) let mice through.
Gaps around pipes and utilities entering your home. These are common entry points.
Openings around vents. Check where the dryer vent, bathroom fan, and kitchen vent exit.
Holes in walls or siding. Look for damage from age or weather.
Gaps under doors and windows. Especially basement doors and old window frames.
Openings in the roof line where gutters meet the house.
Seal With the Right Materials
Not all sealants work equally.
Steel mesh and hardware cloth work best. Rodents can’t chew through steel. Install it over larger openings before caulking.
Caulk seals smaller gaps. Use exterior-grade silicone caulk. It stays flexible and lasts years.
Avoid using just foam. Rodents chew through it. Use foam first, then cover with hardware cloth.
For pipes, wrap hardware cloth around the opening, then caulk around it.
Focus on High Risk Areas
Attics and crawl spaces are rodent favorites. Seal gaps where pipes, wires, and vents enter.
Basements have foundation cracks. Seal every visible gap.
Kitchens are food sources. Seal under cabinets and around appliances.
Around the foundation is critical. This is the main rodent entry zone.
STEP 3: REMOVE FOOD SOURCES
Rodents need food to survive. Cutting off their food supply makes your home less attractive.
Eliminate Rodent Food
Store food in sealed, hard containers. Plastic bags and boxes don’t work,rodents chew through easily. Use glass or metal containers.
Don’t leave pet food out overnight. Feed pets during the day, then clean up immediately.
Clean up crumbs immediately. Don’t leave dishes in the sink. Rodents eat at night when it’s quiet.
Take out trash regularly. Keep garbage in sealed containers. Outdoor trash should be in sealed bins, not open bags.
Remove clutter where rodents hide. Store items in sealed boxes in closets. Don’t pile things on the floor.
Eliminate Water Sources
Fix leaky pipes. Even small drips provide water rodents need.
Don’t leave standing water. Check for puddles in basements and under sinks.
Reduce moisture. Use a dehumidifier in damp areas. Dry spaces are less attractive to rodents.
STEP 4: SET TRAPS
Once you’ve sealed entry points and removed food, traps work better.
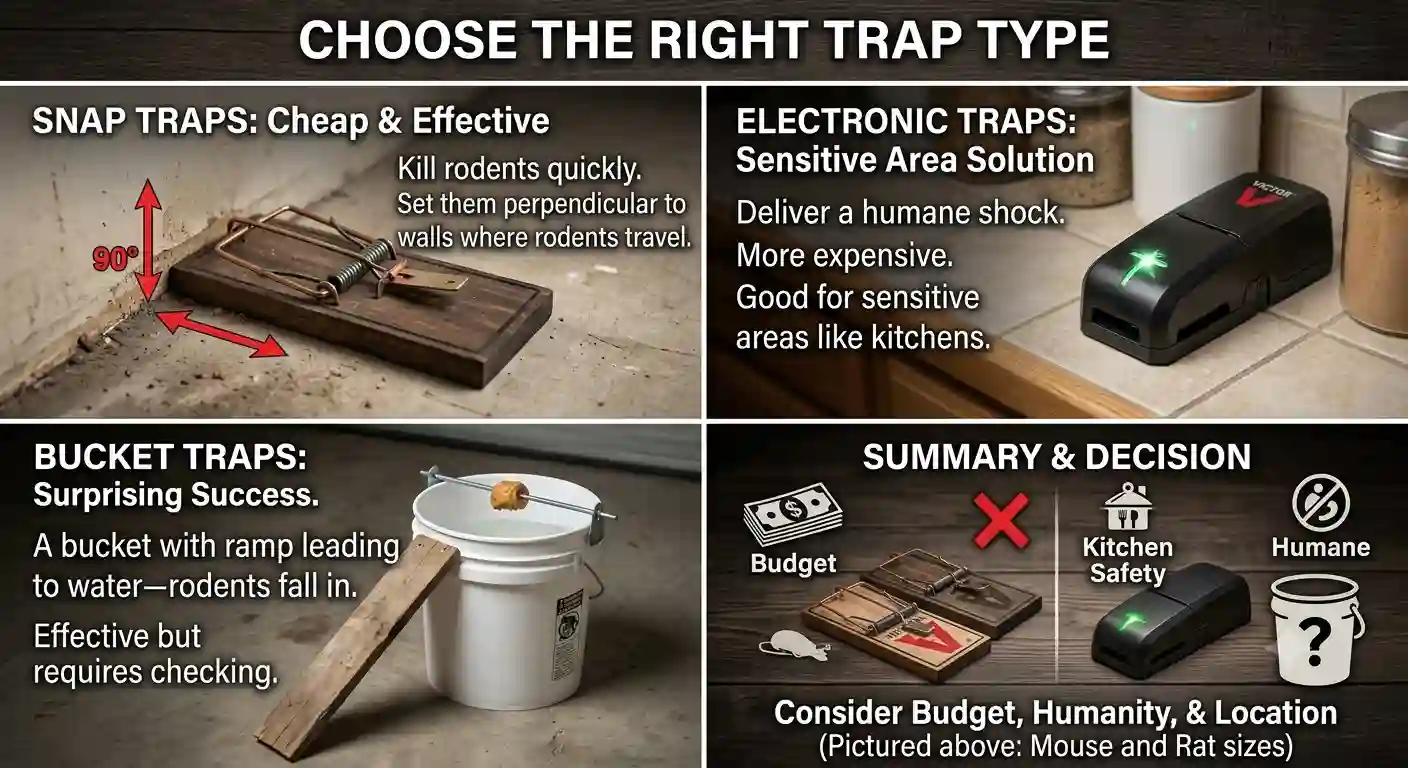
Choose the Right Trap Type
Snap traps are cheap and effective. They kill rodents quickly. Set them perpendicular to walls where rodents travel.
Electronic traps deliver a shock. More humane, but more expensive. Good for sensitive areas like kitchens.
Bucket traps work surprisingly well. A bucket with ramp leading to water. rodents fall in and can’t escape. Effective but requires checking.
Avoid poison. It kills rodents in hidden spaces, causing smell and mess. Plus, pets and children risk accidental exposure.
How to Set Effective Traps?
Place traps along walls where rodents travel. They don’t cross open spaces ,they follow walls.
Use bait that attracts them. Peanut butter, chocolate, and seeds work. Bait the trap securely so they can’t steal it without triggering.
Check traps daily. A dead rodent left for days causes odor problems.
Wear gloves when handling traps and rodents. Diseases can spread through contact.
Set multiple traps. One trap rarely catches all rodents. Set 3-5 traps in problem areas.
Placement Strategy
Put traps in the kitchen, attic, and any area with droppings. Concentrate traps where you see evidence.
Don’t just put one trap. Rodents avoid traps at first. Multiple traps increase your chances.
Check traps every morning before you start your day.
STEP 5: CLEAN UP CONTAMINATION
Rodent droppings and urine carry diseases. Proper cleanup is important.
Safe Cleanup Process
Wear gloves and a mask. Diseases can spread through dust and airborne particles.
Dampen the area with bleach solution (1 part bleach to 10 parts water). This kills germs and prevents dust.
Wipe up all visible droppings and contaminated material.
For contaminated insulation, it’s safer to replace it. Insulation is cheap—health problems aren’t.
Disinfect the area thoroughly. Use bleach solution on surfaces.
Let the area air out for 30 minutes after cleaning.
Dispose of contaminated materials in sealed bags in outdoor trash.
Attic and Crawl Space Cleanup
These spaces need special attention. If contamination is heavy, consider professional cleanup.
Rodent waste in insulation reduces its effectiveness anyway. Replacing it is often smarter than trying to clean.
STEP 6: PREVENT FUTURE INFESTATIONS
After you’ve removed rodents, keep them out.
Ongoing Prevention
Trim tree branches away from your roof. Rodents use branches as highways to your home.
Keep gutters clean. Debris creates places for rodents to hide.
Seal gaps as they appear. Home maintenance prevents new entry points.
Don’t store food in your garage, shed, or attic. Rodents will find it.
Keep your yard clean. Remove brush piles, fallen branches, and debris where rodents hide.
Check your home quarterly for new gaps or cracks. Fix them immediately.
WHEN DIY ISN'T ENOUGH
Some situations need professional help.
Signs You Need a Professional
Active infestation in multiple rooms means the problem is serious. Professional extermination is faster and more reliable.
You’ve tried DIY methods for 2 weeks with no improvement. This signals a bigger problem.
You found nests in multiple locations. This means breeding population ,harder to eliminate alone.
You’re uncomfortable handling rodents or traps. Professional technicians deal with this daily.
You suspect contamination in insulation or walls. Professional cleanup removes health hazards safely.
Your home has structural issues making sealing difficult. Professionals can find and seal entry points you miss.
What Professionals Do Better
Licensed technicians know rodent behavior. They find entry points homeowners miss.
They use commercial-grade equipment and methods more effective than consumer products.
They seal entry points professionally, preventing re-infestation.
They clean and disinfect contaminated areas safely.
They set up monitoring to ensure the problem is truly solved.
DIY TIPS THAT ACTUALLY WORK
The Most Effective Tricks
Multiple traps catch more rodents than single traps. Use 5-10 traps, not just one.
Peanut butter is the best bait. Rodents love it and can’t steal it easily from traps.
Check traps daily in early morning. You’ll catch more rodents before they become active.
Seal gaps first, then trap. Sealing without trapping just traps rodents inside your walls (bad smell).
Combine trapping with removal of food sources. Hungry rodents are easier to catch.
Watch for new entry points. Rodents will try alternate routes if main entry is sealed.
Common DIY Mistakes to Avoid
Don’t rely only on poison. It causes dead rodents in hidden spaces.
Don’t assume one trap is enough. Rodents are numerous and trap-shy.
Don’t leave food out while trying to eliminate rodents. You’re fighting yourself.
Don’t ignore small gaps. Quarter-inch openings let mice through.
Don’t stop after one successful week. Rodents may return. Keep prevention active.
Don’t handle dead rodents without protection. Diseases spread easily.
QUICK ACTION PLAN
Week 1:
- Identify rodent entry points
- Buy sealing materials and traps
- Seal major entry points
- Set traps along walls
- Clean up visible droppings
Week 2:
- Check traps daily
- Dispose of captured rodents
- Seal any new entry points
- Remove all food sources
- Clean and disinfect contaminated areas
Week 3-4:
- Continue trap checks
- Keep vigilant for new signs
- Maintain sealed entry points
- Monitor for new activity
Ongoing:
- Quarterly home inspections
- Trim vegetation away from home
- Keep food sealed and stored properly
- Address any new gaps immediately
Need Professional Rodent Control?
Call +1-650-765-1586

- 640 Bair Island Road Suite 107 Redwood City CA 94063 United States
Providing reliable rodent inspection, removal, exclusion, and prevention services for homes and businesses throughout Redwood City. Fast response, effective solutions, and long-term protection.
Quick Links
Visit our Redwood City service hub near Courthouse Square; full parking and access details are shared after your appointment is scheduled.